9Patch 介紹
9Patch圖片介紹
9Patch圖片是一種特殊的png圖片,以.9.png結尾,它在原始的圖片四周各添加一個寬度為1像素的像條,這4條線條決定了該圖片的縮放規則、內容顯示規則。
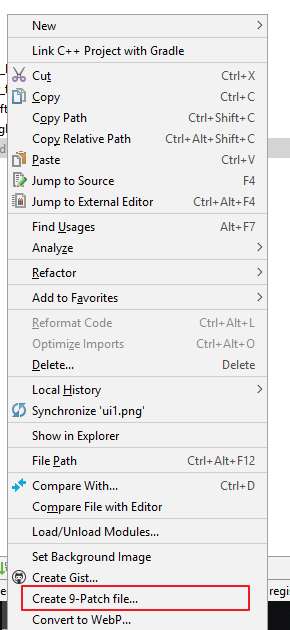
在Android Studio 上編輯.9.png,具體是在Android Studio上右鍵點擊你要編輯的照片,選擇Create 9-Patch file就可以進入編輯界面。
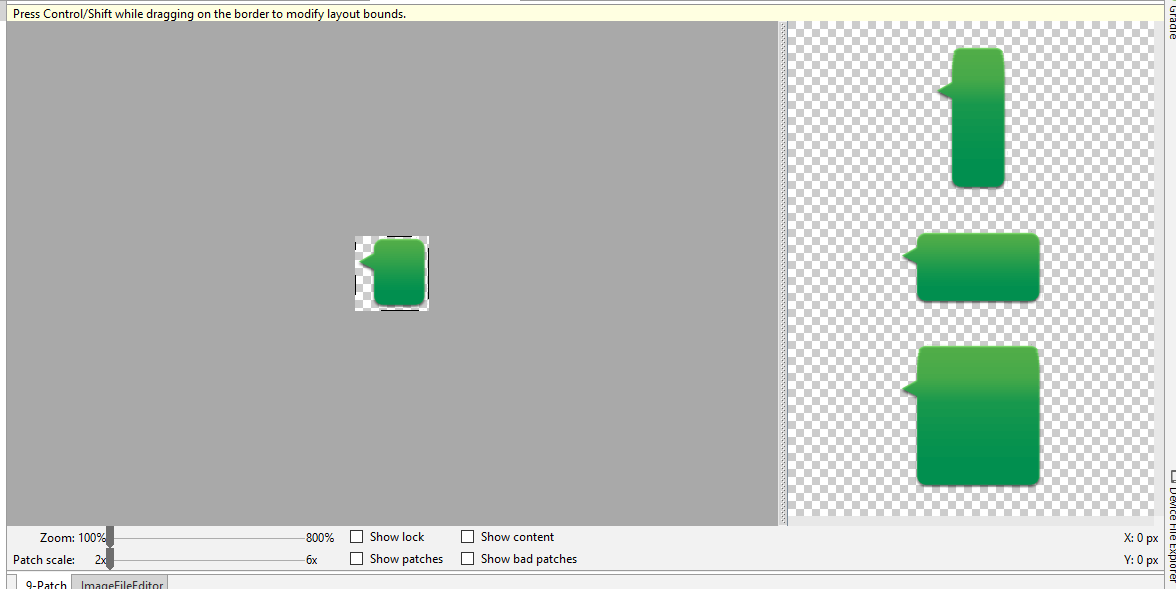
這就是9-Patch的編輯界面
Optional controls include:
- Zoom: Adjust the zoom level of the graphic in the drawing area.
- Patch scale: Adjust the scale of the images in the preview area.
- Show lock: Visualize the non-drawable area of the graphic on mouse-over.
- Show patches: Preview the stretchable patches in the drawing area (pink is a stretchable patch), as shown in figure 2, above.
- Show content: Highlight the content area in the preview images (purple is the area in which content is allowed), as shown in figure 2.
- Show bad patches: Adds a red border around patch areas that may produce artifacts in the graphic when stretched, as shown in figure 2. Visual coherence of your stretched image will be maintained if you eliminate all bad patches.
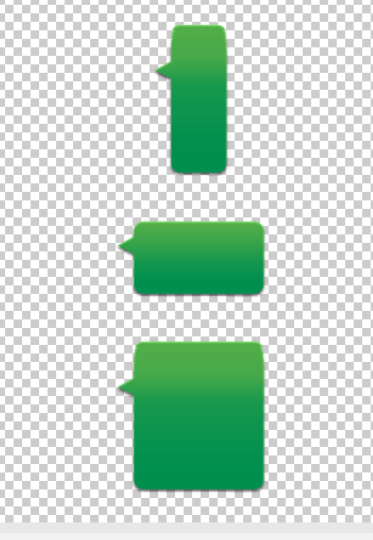
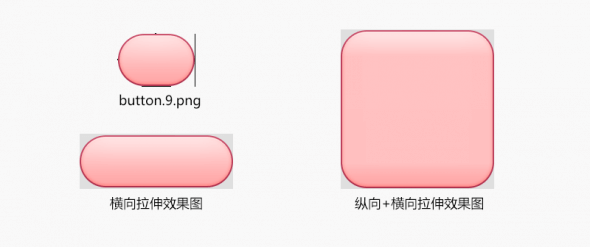
這3個從上到下依次是
- 縱向拉伸的預覽
- 橫線拉伸的預覽
- 縱橫向一起拉伸的預覽
9Patch的規則:
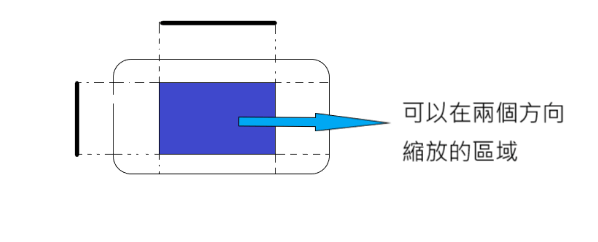
上側和左側的黑色線段共同決定了圖片的縮放區域
- 上側的黑色線段為上邊界繪製巨型,它覆蓋的區域可以水平縮放。
- 左側的黑色線段為左邊界繪製巨型,它覆蓋的區域可以縱向上縮放。
- 它們二者的交集區域可以在兩個方向上縮放
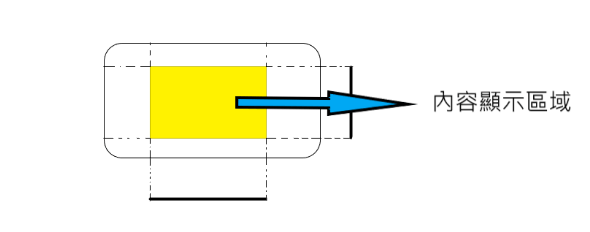
下側和右側的黑色線段共同決定了圖片的內容顯示區域
- 以下側的黑色線段為下邊界繪製巨型
- 以右側的黑色線段為右邊界繪製巨型
- 它們二者的交集區域為內容顯示區域
9Patch 相關文章
Android設計中如何切圖.9.png(點9圖)
在Android的設計過程中,為了適配不同的手機分辨率,圖片大多需要拉伸或者壓縮,這樣就出現了可以任意調整大小的一種圖片格式“.9.png”。這種圖片是用於Android開發的一種特殊的圖片格式,它的好處在於可以用簡單的方式把一張圖片中哪些區域可以拉伸,哪些區域不可以拉伸設定好,同時可以把顯示內容區域的位置標示清楚。
本文結合一些具體的例子來看下.9.png的具體用法。
首先看下普通的.png資源與.9.png的資源區別:
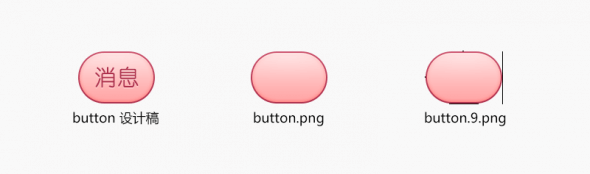
普通的png資源就不多介紹了,可以明顯看到.9.png的外圍是有一些黑色的線條的,那這些線條是用來做什麼的呢?我們來看下放大的圖像:
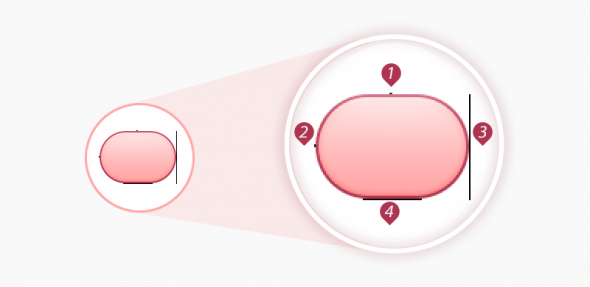
放大後可以比較明顯的看到上下左右分別有一個像素的黑色線段,這裏分別標註了序號。簡單來説,序號1和2標識了可以拉伸的區域,序號3和4標識了內容區域。當設定了按鈕實際應用的寬和高之後,橫向會拉伸1區域的像素,縱向會拉伸2區域的像素。如下圖:
拉伸的含義應該比較容易理解,但是內容區域的標註有什麼意義呢?我們來看下圖:
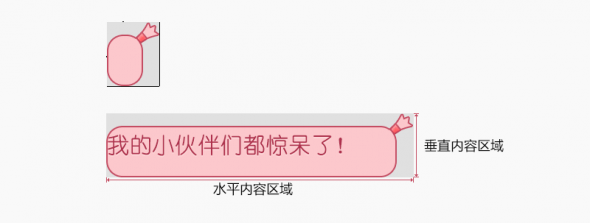
這裏程序設置的文字垂直居中,水平居左的對齊方式。對齊方式是沒有問題的,但是對於這種大圓角同時又有些不規則邊框的的圖形來説,錯誤的標註方式會讓排版看起來很混亂。所以我們需要修正內容區域的線段位置和長度。
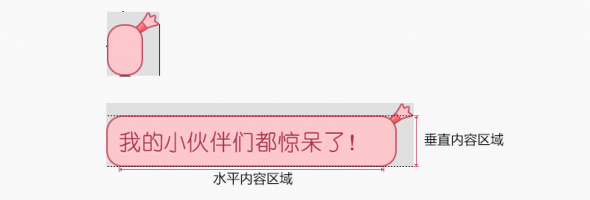
把橫向的內容區域縮短到圓角以內,縱向的內容區域控制在輸入框的高度以內,這樣文字就可以正常顯示了。
這裏還有一種特殊情況,就是本身是.9.png的資源,但是在修改過程中你希望這張.9.png不能被拉伸(在做皮膚的情況中有可能會遇到),那怎麼辦呢?只要把拉伸區域的點點在透明像素的地方就可以了,這樣拉伸的時候會拉伸透明部分的像素,而不會拉伸圖像本身。如下圖:

大家可以看到拉伸區域的黑點是可以不連續的。
説了半天.9.png的用法,那.9.png如何輸出呢?有很多種方式可以輸出.9.png,比如説用draw9patch.bat這個工具,或者簡單一點,用photoshop直接輸出。輸出的方式是先輸出普通的png資源,然後擴大畫布大小,上下左右各空出一個像素,再用一個像素的鉛筆工具(顏色選擇純黑色),上下左右分別畫點就可以了,保存的時候注意把後綴修改為.9.png。
有兩點需要特別注意下:
1.最外圍的一圈像素必須要麼是純黑色,要麼是透明,一點點的半透明的像素都不可以有,比如説99%的黑色或者是1%的投影都不可以有;
2.文件的後綴名必須是.9.png,不能是.png或者是.9.png.png,這樣的命名都會導致編譯失敗。
A simple guide to 9-patch for Android UI
While I was working on my first Android app, I found 9-patch (aka 9.png) to be confusing and poorly documented. After a little while, I finally picked up on how it works and decided to throw together something to help others figure it out.
Basically, 9-patch uses png transparency to do an advanced form of 9-slice or scale9. The guides are straight, 1-pixel black lines drawn on the edge of your image that define the scaling and fill of your image. By naming your image file name.9.png, Android will recognize the 9.png format and use the black guides to scale and fill your bitmaps.
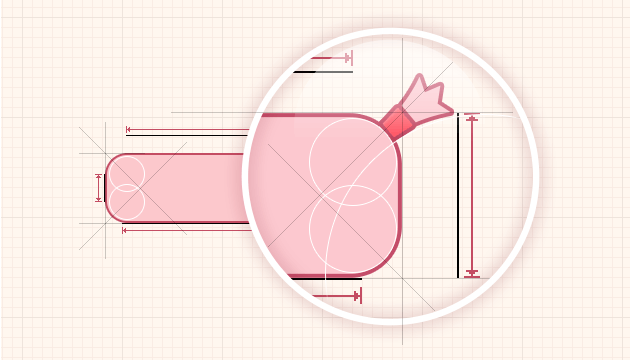
Here’s a basic guide map:
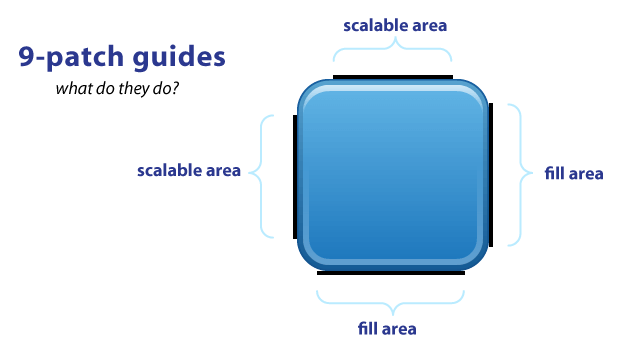
9-patch-guides
As you can see, you have guides on each side of your image. The TOP and LEFT guides are for scaling your image (i.e. 9-slice), while the RIGHT and BOTTOM guides define the fill area.
The black guide lines are cut-off/removed from your image - they won’t show in the app. Guides must only be one pixel wide, so if you want a 48x48 button, your png will actually be 50x50. Anything thicker than one pixel will remain part of your image. (My examples have 4-pixel wide guides for better visibility. They should really be only 1-pixel).
Your guides must be solid black (#000000). Even a slight difference in color (#000001) or alpha will cause it to fail and stretch normally. This failure won’t be obvious either*, it fails silently! Yes. Really. Now you know.
Also you should keep in mind that remaining area of the one-pixel outline must be completely transparent. This includes the four corners of the image - those should always be clear. This can be a bigger problem than you realize. For example, if you scale an image in Photoshop it will add anti-aliased pixels which may include almost-invisible pixels which will also cause it to fail*. If you must scale in Photoshop, use the Nearest Neighbor setting in the Resample Image pulldown menu (at the bottom of the Image Size pop-up menu) to keep sharp edges on your guides.
This is actually a “fix” in the latest dev kit. Previously it would manifest itself as all of your other images and resources suddenly breaking, not the actually broken 9-patch image.
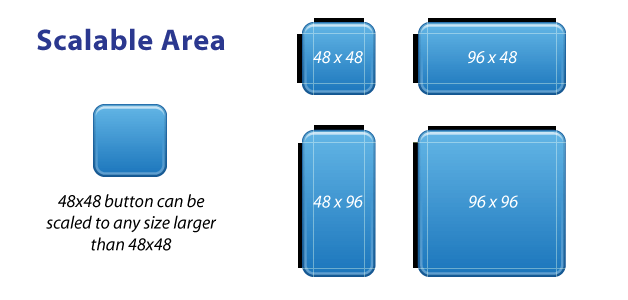
scalable-area
The TOP and LEFT guides are used to define the scalable portion of your image - LEFT for scaling height, TOP for scaling width. Using a button image as an example, this means the button can stretch horizontally and vertically within the black portion and everything else, such as the corners, will remain the same size. The allows you to have buttons that can scale to any size and maintain a uniform look.
It’s important to note that 9-patch images don’t scale down - they only scale up. So it’s best to start as small as possible.
Also, you can leave out portions in the middle of the scale line. So for example, if you have a button with a sharp glossy edge across the middle, you can leave out a few pixels in the middle of the LEFT guide. The center horizontal axis of your image won’t scale, just the parts above and below it, so your sharp gloss won’t get anti-aliased or fuzzy.
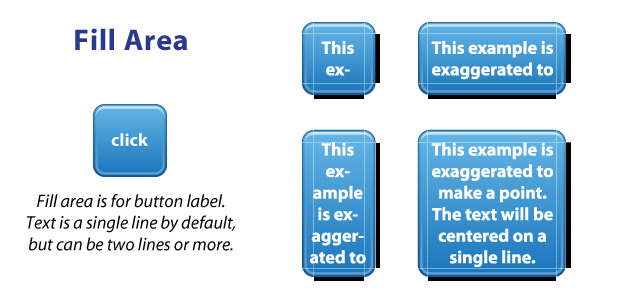
Fill area guides are optional and provide a way define the area for stuff like your text label. Fill determines how much room there is within your image to place text, or an icon, or other things. 9-patch isn’t just for buttons, it works for background images as well.
The above button & label example is exaggerated simply to explain the idea of fill - the label isn’t completely accurate. To be honest, I haven’t experienced how Android does multi-line labels since a button label is usually a single row of text.
Finally, here’s a good demonstration of how scale and fill guides can vary, such as a LinearLayout with a background image & fully rounded sides:
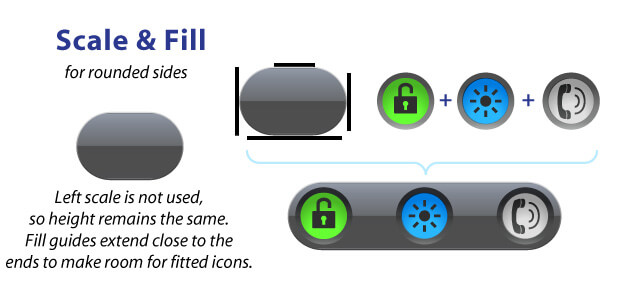
With this example, the LEFT guide isn’t used but we’re still required to have a guide. The background image don’t scale vertically; it just scales horizontally (based on the TOP guide). Looking at the fill guides, the RIGHT and BOTTOM guides extend beyond where they meet the image’s curved edges. This allows me to place my round buttons close to the edges of the background for a tight, fitted look.
So that’s it. 9-patch is super easy, once you get it. It’s not a perfect way to do scaling, but the fill-area and multi-line scale-guides does offer more flexibility than traditional 9-slice and scale9. Give it a try and you’ll figure it out quickly.
其他資料
 Wechat
- Alipay
- Stripe